Google XML Sitemaps Increase your SEO – Check Now
SEO is an important part of an online administrator or digital content manager. An effective website is not just appealing to human visitors – they are also be easy for online spiders and bots to understand and “crawl” their content.
That is why XML Sitemaps are important – They tell the machines where each page can be found, how important each page is relative to the rest of the site and how often it is updated/changed.
Through the use of simple plugins (or manually accessing the file if you’re more technically competent) a sitemap can be created and modified. By modifying the file (robots.txt), you can change how often robots should crawl your site for specific URLs, change the priority setting of an individual page or even block the bots from crawling certain pages altogether. A situation I often do this for is if we have historical blog posts that continue to be heavily trafficked. I’ll want to increase the priority of those posts slightly higher than newer ones so as to ensure they continued to be crawled and that any change that’s made is more likely to be picked up by Google and Bing.
Sitemaps can easily be edited to tell crawlers which pages are worth crawling and which are to be ignored – particularly if you use a pre-designed sitemap.
Which WordPress Plugin Is Best For Sitemaps?
If you’re one of the millions of web admins who use WordPress, I highly recommend the Google XML Sitemaps plugin by Arne Brachold. It is easy to setup and best of all, is very easy to manipulate should you wish to feature a particular page or skip another. It also makes a robot-friendly URL (ours is https://creativeagencysecrets.com/sitemap.xml) meaning it is good for your SEO too.
How Optimise Your Sitemap’s Effectiveness
 Ultimately there is no point in creating a sitemap if it’s not easily crawlable by robots such as Google. Therefore, testing and uploading your sitemap using Google Webmaster tools is logically the next step.
Go to Google Webmaster Tools and add your site. Usually, the easiest way to verify your site is to use your Google Analytics logins. If this doesn’t work or you wish to set up an account without access to Google Analytics, you may have to upload an html file to the site.
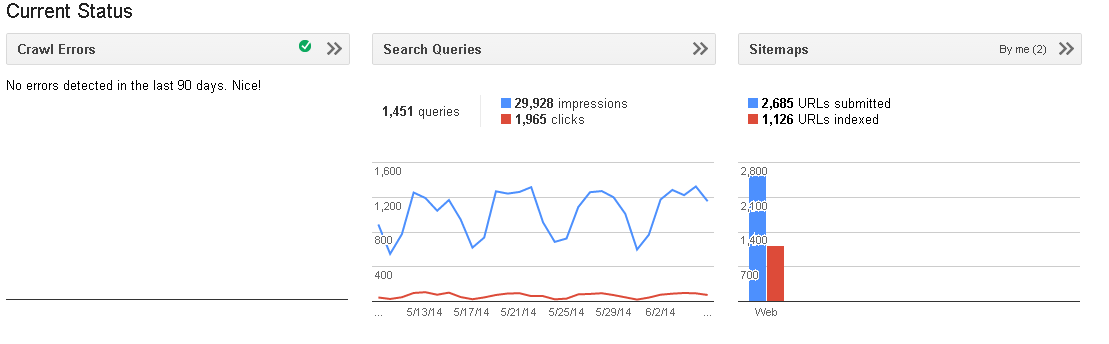
Upon verifying your site, click Sitemaps in the left menu which can be found under the “Crawl” section. Next, Add/Test your sitemap by clicking the “Add/Test Sitemap” red button in the top right of the screen.
In the textbox that appears, assuming you haven’t changed the default URL (I’d recommend you don’t), all you should have to enter is “sitemap.xml”. Google will then check to ensure it’s a valid URL and will alert you if there are any problems it detects (see screenshot below) – fortunately, Google also provides explanations as to what causes these errors which usually helps get to the root cause of the problem quickly. Normally though, a first time, clean installation won’t have any issues. Errors are usually caused if your website has been around for a while – especially if the URL structure of your site has changed or you’ve manually changed URLs of certain pages post-publication.

Click To Enlarge
Hopefully though there are no major errors and that you’re able to fix all minor issues. Google will show how many pages you’ve submitted (it naturally skips certain ones like eCommerce pages) and how many it’s actually indexed. Remember, the more pages Google indexes, the better Google knows your site and the more likely it is to send genuinely interested visitors to the pages you want them to visit first time.
Success
Click To Enlarge
Leave a Reply
Want to join the discussion?Feel free to contribute!