Social Media is the “in” thing. We often say to our clients – where are your customers? If they aren’t using Twitter or Facebook then why bother using it for business purposes?
No one really likes discussing death and the topics that surround it – so why would they want to even consider it on social media?
That begs the question: how should a Funeral Home use social media, if at all?
Well this depends on a variety of factors – who your market is, what will be successful on social media and on what social media channel you operate in.
Many funeral homes are already exploiting channels such as Facebook to share obituaries and funeral dates. This is of course a useful feature, which should be utilised with social media, but it should not be your only type of content. People will only check your content and follow/like your page if you post content which is interesting and different from your competitors.
Think about where your funeral home is situated
Are you operating in a small town where everybody knows everybody? Then your messages should be more personable and meaningful than a simple announcement. Whether it be a remembrance post (after 1 year) or a death of a previous local, thinking of social media as more than a simple noticeboard is the easiest way to get in the right frame of mind.
Larger funeral homes (which often deal with people they’ve never met before) may find it appropriate to share famous deaths from around the world and share alternative ways to celebrate a life. This will act as a break from the otherwise seemingly continual stream of obituaries.
What sorts of things work on social media
What works on social media? It’s not like you can post pictures of dead people…
Social media can offer potential customers an opportunity to “view” your facilities. Taking photos of all available areas can show off your home and help guide people to your home. The funeral industry is relatively insensitive to price. This means that once they physically view your premises, they usually commit to doing the funeral service there. Therefore, you all that is needed is to get people to visit your home and if seeing photos of it online helps, then it is definitely worth doing.
Social media can help give ideas for other potential customers. Taking photos of other services and posting other ideas of how to celebrate a loved one’s life is another way of adding varying content to your page.
Which channel are you on?
The Social Media channel you use will determine whether what you post will be successful or not. Twitter encourages short text messages with a link whereas Facebook thrives on videos & photos. Pinterest focuses purely on photos, a useful tool if you want to share photos of your home/grounds or beautiful services (which can be shared with attendees).
Ensuring you use the appropriate content for each channel will prevent your social media efforts being frowned upon.
No related posts.
https://creativeagencysecrets.com/wp-content/uploads/2014/04/CAS_Logo_1line_RGB.jpg00Creative Agency Secrets Teamhttps://creativeagencysecrets.com/wp-content/uploads/2014/04/CAS_Logo_1line_RGB.jpgCreative Agency Secrets Team2013-12-02 16:38:472013-12-02 16:38:47Social Media Marketing For Funeral Homes
QR codes enable website linking from mobile phones. And are a simple way to connect your prospects to your physical marketing materials.
They are butt-ugly.
Who wants to ruin a nice design with a pixellated image plonked down in the corner of the page?
We’ve found easy ways to improve the look of QR.
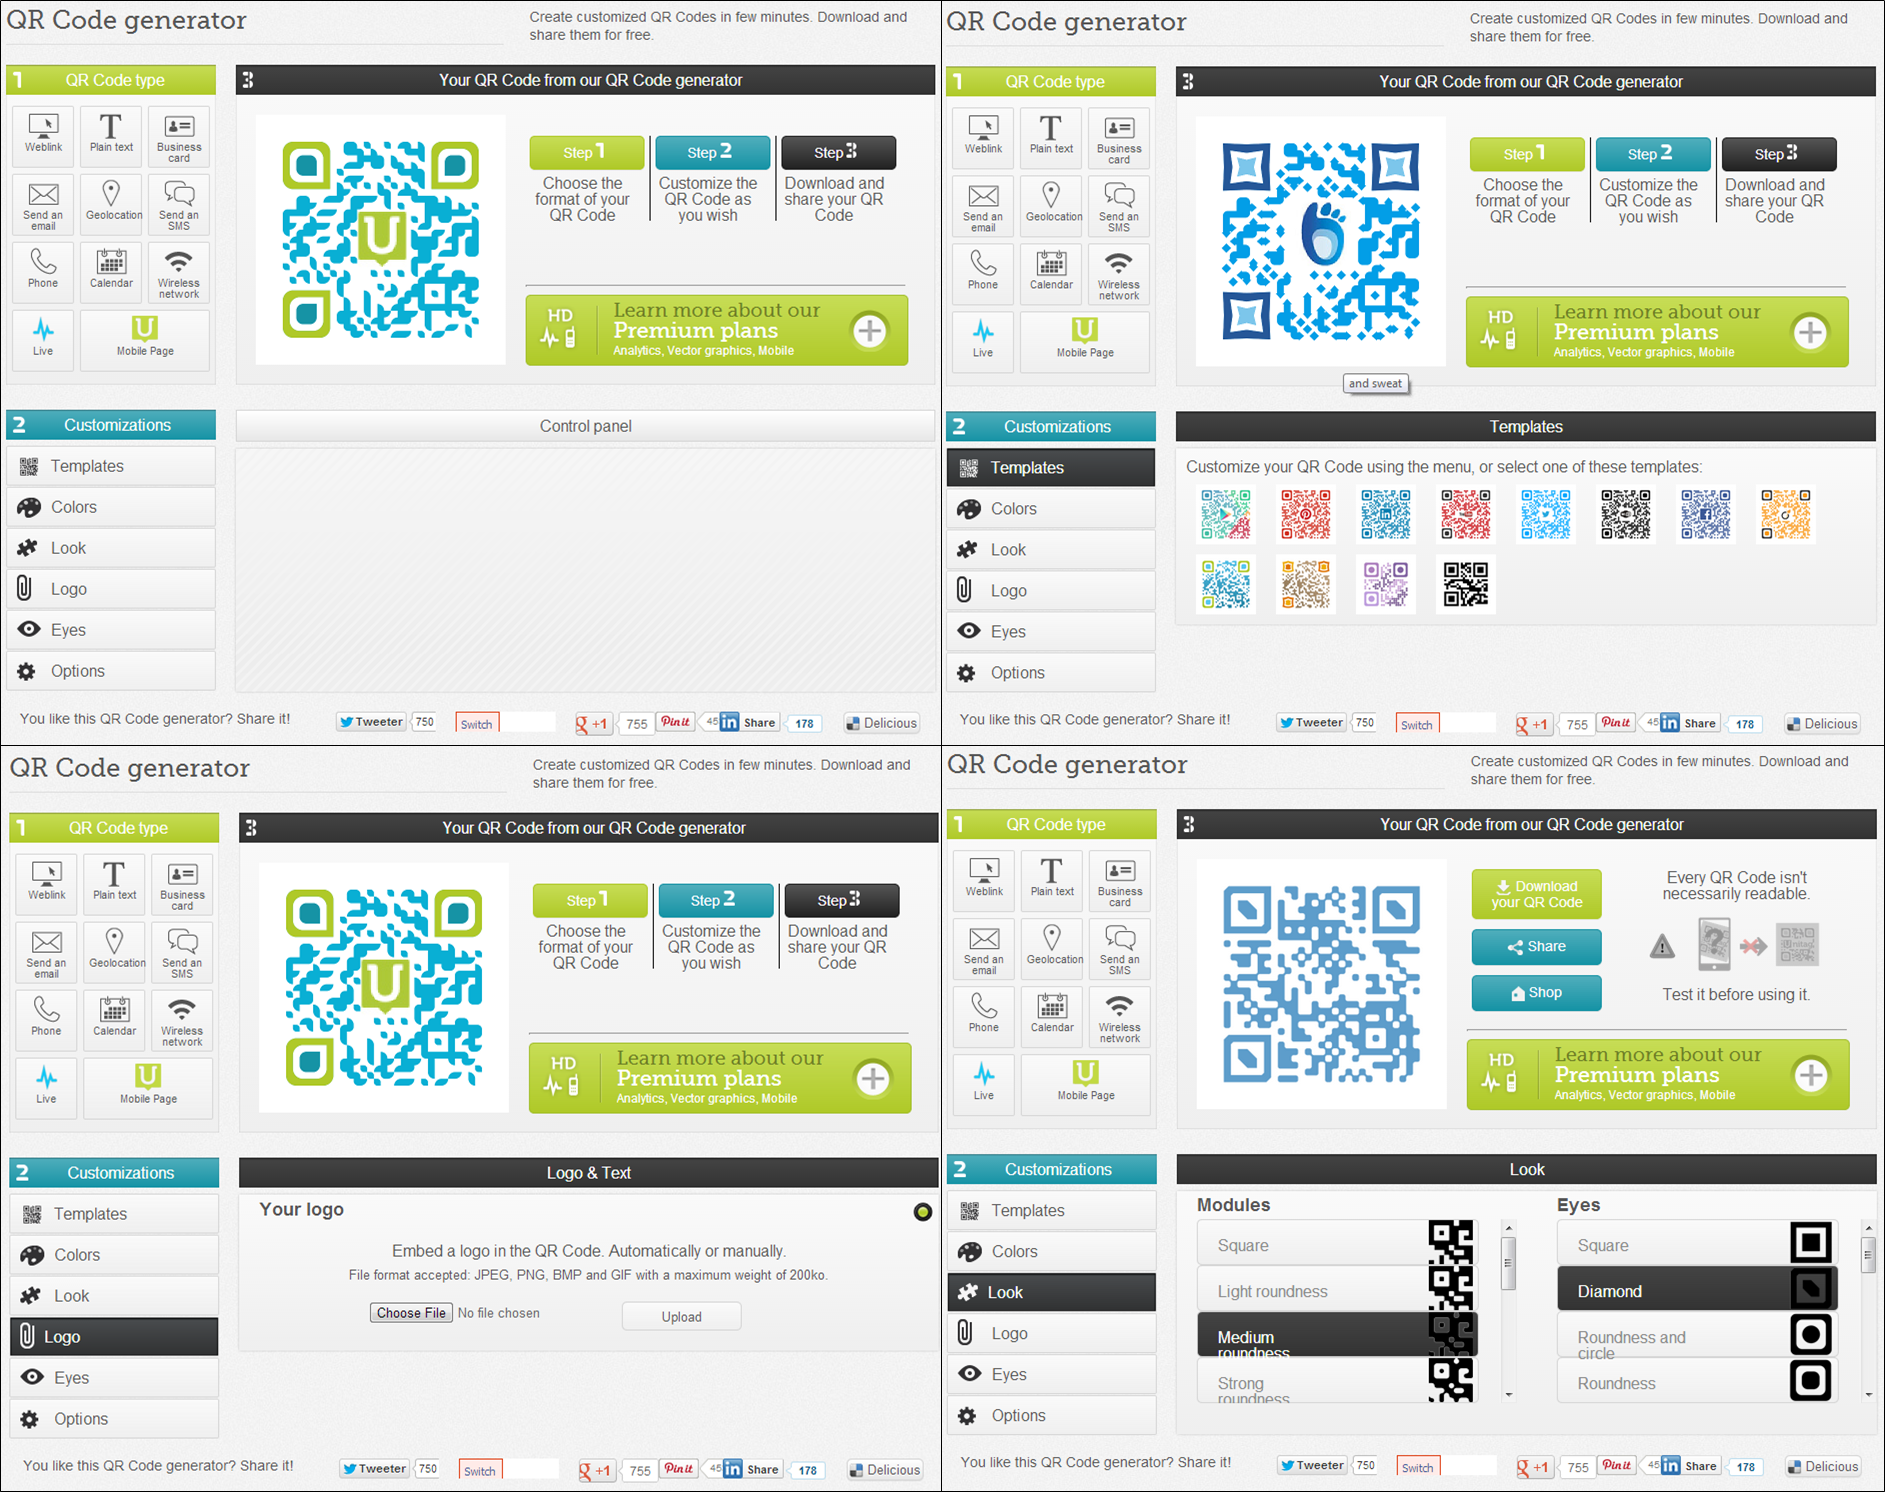
Unitag QR Code Generator Review
Unitag Live is a website that lets you create and customise QR codes in a huge variety of ways. More free online QR code generators have limited customisation but Unitag lets you add your logo into the code, change the corner images and alter the colours.
Unitag Live Features
The first step in the QR code creation process is picking the website your QR code will link users to. You can send them to a location using the GPS on their scanner or tell their smartphone to instantly call a number. You can even have the QR code call in a business card for the user to look at.
Once you’ve directed users to the right content you can start customising the look of your QR code. Unitag has several predefined template ideas, but gives you the power to alter every aspect of your QR code in a variety of ways.
Colors (American spelling) – allows you to modify the QR code colour. You can also blend two colours into the QR code which gives a shaded rainbow effect across it.
Look – this modifies the shape and style of the corners and main section of your QR code. The main section refers to the dots that make up the code.
Logo – uploading a photo here places that uploaded image in the center of your QR code. Large files cannot be uploaded however so you’ll have to save big images as smaller ones (e.g. reduce the size in powerpoint and re-save it as another picture).
Eyes – this feature changes the colour of the inside and outside of the corners on your QR code.
Options – here you can change the background colour of your QR code, it’s shading and the quality of the image (the size). Be wary of altering this too much because if the background colour clashes with the QR code colour then the QR code cannot be read by scanners (e.g. dark purple QR codes on a dark blue background will not work).
You can also pay a yearly fee to get extended features from Unitag including:
1 or more mobile websites
QR Codes management and storing
High resolution exporting
Template management
Batch generation
Editable QR Code content
Tracking & analytics
Intelligent filter (e.g. different languages)
Multi-user accounts
Statistics per campaign
XLS and CSV export for statistics
Definitely explore the higher level plans if you run marketing campaigns that require heavy statistics tracking. Website clickthroughs and tracking on Google Analytics would more than likely track the same statistics, however.
If you’re looking for a simpler QR code creator online you can also try:
Just to give you an idea of what these codes look like and are capable of, here’s one that leads back to the Creative Agency Secrets homepage!
No related posts.
https://creativeagencysecrets.com/wp-content/uploads/2014/04/CAS_Logo_1line_RGB.jpg00Creative Agency Secrets Teamhttps://creativeagencysecrets.com/wp-content/uploads/2014/04/CAS_Logo_1line_RGB.jpgCreative Agency Secrets Team2013-11-15 15:38:002013-11-12 14:51:40How to make a visually attractive QR code
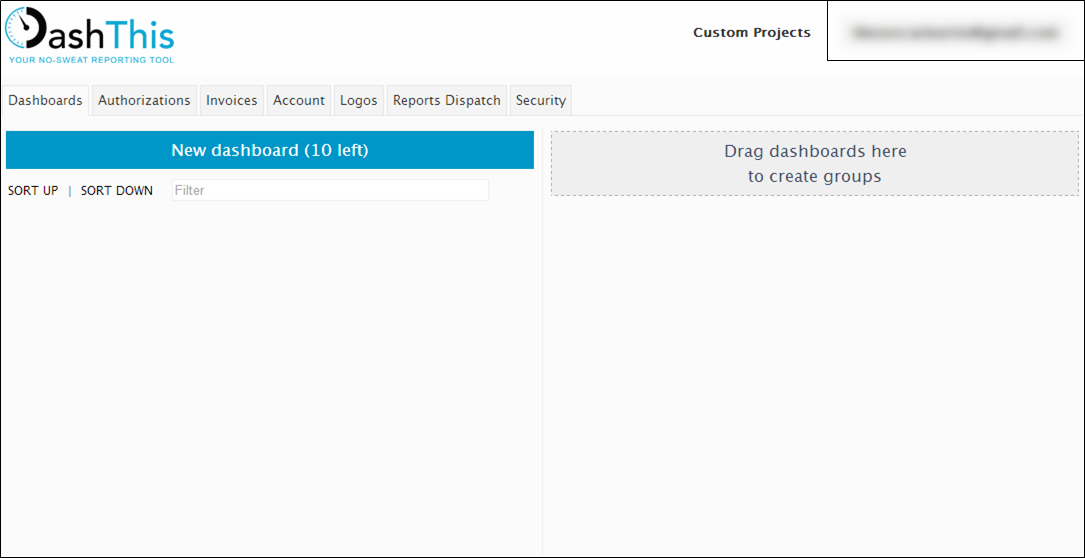
If you’re looking to keep track of multiple social media pages or for a way to track the success of a campaign you’re running you might want to look at DashThis. With DashThis you add in links to your persona around the web (like your Twitter or Facebook account) and then create a “dashboard” of information about them. We recently reviewed DashThis for a client and this is our analysis:
How DashThis works
As an analytics tool DashThis provides in-depth reports on your pages using devices called “DASHBOARDS”. You get acertain number of dashboards per month but can swap them for different periods or social media links, essentially re-using them. Once you have loaded in your page (e.g. Facebook) you can select it when you next create a dashboard. You can customise these dashboards to show the information you want, but you cannot seem to take it further than that and must use what they have built in.
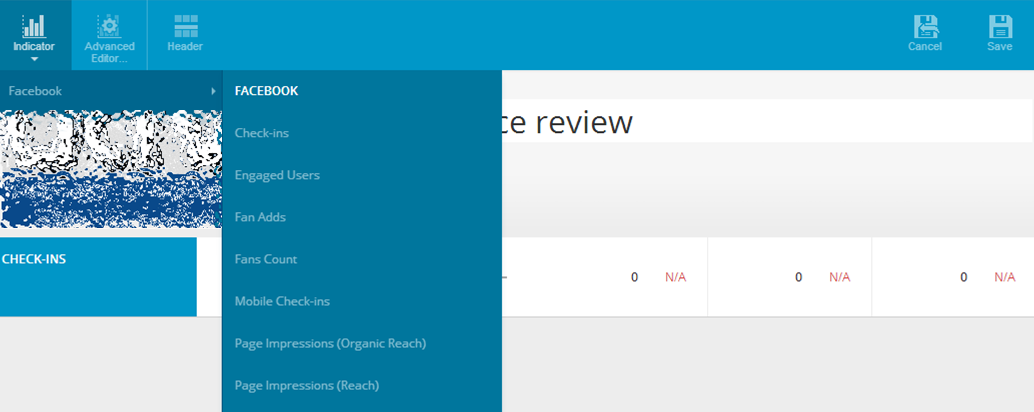
As an example, Facebook pages get stats tracking for things including:
Fan/ like count and increase over your chosen period
Fans added / new likes over your chosen period
Page impressions (views/ reach) over your chosen period
How many impressions were viral over your chosen period
Page interactions (comments, post likes, etc)
Top posts (by various groups e.g. engaged users) over your chosen period
Number of people talking about you over your chosen period
Number of stories about you over your chosen period
etc
Dashboards are versatile and can be used for a variety of statistics. The rolling dashboards are for instant statistics. Periodic reports do just that, report across a set period. Campaign dashboards follow the response your activities have gathered over a given period. This gives DashThis a wider variety of applications outside of just tracking social media page statistics.
Your account
The FREE account ends in just two weeks, which you can extend to a month by sharing DashThis.com otherwise your account will become inactive. From then on you have to pay a monthly fee where you get a number of dashboards starting at 1 dashboard for $19, then 3 for $39, 10 for $99 and so on. This means you can only have a certain number of dashboards active at any one time but you can delete one and recreate it for another page. In that way you could start with 1 dashboard and check a series of reports daily, although this could become time consuming.
Who would DashThis be good for?
DashThis is a comprehensive statistics tracking tool suitable for businesses managing a wide variety of pages, particularly social media pages. In some cases pages have their own tracking systems (such as Facebook on company pages) so if a business has a limited number of pages to track, having them all in one place won’t do them much good.
The picture above shows the multitude of pages DashThis supports, including a new way to view Google Analytics.
If you’re a company overwhelmed by statistics tracking on multiple pages you’ll want to give DashThis a trial run. If you already have your analytics figured out it’s best to give this one a miss.
We run a monthly podcast for one of our clients which has become fairly popular in it’s respective industry. This is a relatively new ability we’ve learned and as with everything we do, we’re happy to help others learn to do it as well.
To be clear, when we say webinars or podcasts we mean live audio and video feeds (much like radio if it had view-able PowerPoint slides!) which are broadcast over the internet for everyone to view. We record these broadcasts as we do them and give that recording to viewers afterwards and post them on YouTube or SoundCloud.
Create you own webinar
Very recently we got a tweet from a sports coach wanting to start holding webinars and we answered. We arranged a Skype chat, walked them through the programs and techniques we used and introduced them to other possible solutions we found along our journey of developing a quality podcast. Here’s a summary of our advice.
Our process
We use a combination of the program xSplit and the website UStream:
xSplit – recording a webcam or a computer screen is a simple process today, but controlling that recording is an entirely different thing. The FREE program xSplit provides users with multiple “scenes” which operate like a powerpoint presentation. Each “scene” is like a slide in powerpoint and can be customised with images, live screenshots, webcams and more. It also takes audio directly from your computer and microphone, if one is attached. The program can broadcast to multiple sources and can directly record to your computer as a separate option for making videos. While it is only Windows OS compatible (so no support for Mac computers) it provides a lot of flexibility and control to the user.
UStream – when you are broadcasting you need a destination and a place for that broadcast to be viewed by others. We use our paid account on UStream with ads removed to broadcast our live viewing. UStream gives us a way to communicate with our viewers as well via a text based chat beside the video as it plays.
This set up makes it easy for viewers to watch as we just need to send them the link to our UStream account while we take care of the broadcasting and content. With other solutions you may need to download programs, make accounts or have to send attendees passwords. We have tested some of those solutions and for a wide audience and age range they proved too hard and presented barriers to attendance.
Other solutions you could use
Many of these solutions add a level of difficulty for either us or our viewers to join a webinar that we broadcast. However they may suit your needs better than they suit ours:
Google Hangouts – the Hangouts system created by Google is amazing. It allows you to broadcast your computer screen or your web camera to a live stream (then instant recording) on YouTube. For others to view directly they can watch from YouTube. If you’d like to chat to viewers however they would have to join your Hangout and thus disrupts many of your functions. You would have to mute each attendee if you want to talk and then you could communicate with them via text chat. It works but is cumbersome in it’s design. On the other hand it is a free solution without ads and is simple for basic internet users to learn.
Downloadable webinar technologies – there are meeting simulators that can be used effectively to run webinars such as GoToWebinar or Anymeeting. These solutions are often paid, require you and your attendees to download a program and are designed primarily for corporate use. They will take some training to use (especially for your viewers) but the technology is great. If you’re a businessman looking to run online meetings or training sessions this solution is a great way to go. [only problem with Citrix GoToWebinar solution is the meeting invite does not adjust timezone to the recipient’s calendar]
Now that you’ve got access to the tools, you can start exploring the world of broadcasting and build yourself a webinar! If you’re less technical, or would like to put all of your effort into the quality of the webinar, we’d be happy to take the broadcasting task off your hands. Contact us for more details on these technologies or for a quote on what it would take for us to set up and run your webinar.
No related posts.
https://creativeagencysecrets.com/wp-content/uploads/2014/04/CAS_Logo_1line_RGB.jpg00Creative Agency Secrets Teamhttps://creativeagencysecrets.com/wp-content/uploads/2014/04/CAS_Logo_1line_RGB.jpgCreative Agency Secrets Team2013-10-28 17:00:112022-12-19 11:57:06How to Set up and Host Live Webinars
A Twitter manager is an individual who monitors one or more Twitter accounts and engages with Twitter users for those accounts. They are more than an automatic tweeting machine. They think of ways to engage their followers, how to gain new ones and spend much of their time interacting with the Twittersphere (the space of Twitter).
A Twitter manager must keep in mind that they are an entity and represent the values and voice of the account that entity belongs to. This is particularly difficult when they manage multiple accounts as they have to reflect multiple personas in their tweets.
What does a Twitter manager do?
These attributes are exactly what a regular Twitter user will do. However we’re talking about it and looking at it from a Twitter manager’s point of view. Here are the activities a Twitter manager undergoes and how they do them differently…
Creates original tweets: when a tweet first comes into existence it is said to be original, rather than taken from someone else’s tweet.
Shares tweets: this is where a tweet is tweeted again and the original sender is notified and credited. These types of tweets can help smaller pages generate hype and develops relationships with the original tweeter.
Sends and replies to direct messages: known as DMs, direct messages allow twitter users to message each other privately. This opens up the Twittersphere to the sharing of personal details and private conversations.
Uses #hashtags and copies @people in tweets: by using a hashtag or at symbol in a tweet you notify users of that tweet. It comes up in their feeds and is a more reliable way of getting your tweets seen by the Twittersphere.
Follows #hashtags and conversations: a hashtag records all tweets with it attached and you can search via hashtags to follow a topic or conversation. This is crucial to success for Twitter managers as they can follow the best conversations from specific topics related to the account(s) they manage. They show you who tweets the most in that topic, who is important in that topic, what trends are rising and even helps you keep up with big news and events.
Balances their number of followers with the number of people they are following: this is another way of getting noticed. By following a Twitter account (a user) you encourage them to see what tweets you make and they will often reciprocate the follow. So this subsequently grows your followers and provides you with more original tweets to retweet from that user you followed. This also allows you to get more in touch with your followers by direct messaging who you follow as long as they also follow you.
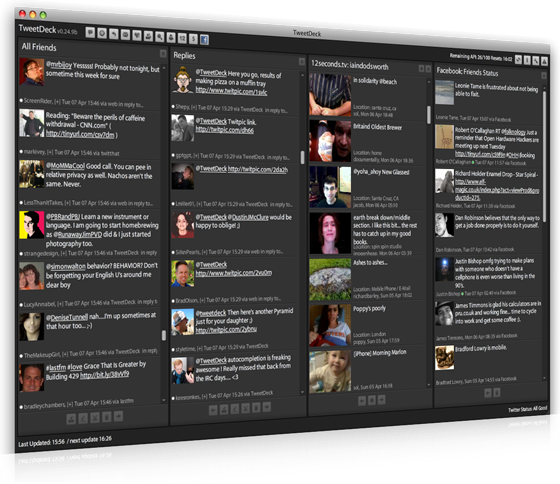
TweetDeck
Tools of a Twitter manager
www.tweetdeck.com = this is a powerful tool that grants you the power to post using multiple Twitter accounts, schedule posts and see every corner of each Twitter account in an instant. Being able to view messages and posts all on one screen improves productivity by a lot, even for just a single account.
www.tweriod.com = if you’d like to know when your followers are online the most, use Tweriod. They’ll send you a report showing you when your followers are most active. From here you can schedule your best tweets using Tweetdeck so they get the most impact and following.
Find many more on the Twitter Tools Listly. There are many tools to follow metrics and statistics for Twitter accounts and show you exactly how to use your account to it’s fullest potential.
Pitfalls of a Twitter manager
Be careful when replying – as a Twitter manager, your voice is that of the accounts you are managing. You have to maintain a constant persona for each account and be careful not to stir up negativity in your followers. For example, I’ve created conversations by simply asking people about what they do in their daily lives. They then get interested enough in me to look at the company web page and learn more about the brand I’m managing.
Share for your audience, but avoid profanity – as you re-tweet content you’ll see great tweets that are inappropriate in language, but perfect in context. Tweak these tweets to be appropriate and make sure you read tweets over a few times. It is easy to quickly retweet something that makes you laugh in the context of the account you manage.
Always give recognition of the source – if you know where it came from, recognise the creator because Twitter is all about following conversations and tweets from the source. If you re-tweet without saying who the tweet is from a lot of the time users will feel you’ve cheated the impact of the original tweet. It discredits your account and makes it seem like you put less effort into it.
Have personality, but don’t be personal – avoid getting too comfortable in your role. Have strict rules in place with how relaxed you can be on interacting with your followers.
Balance your followers and followings – try to keep these levels the same or have your followings higher than the number of followers you have. This promotes constant growth and makes sure you’re friendly with everyone in the industry you’re following for whichever account you are managing.
Final notes on Twitter
Twitter is all about getting shared and found, getting the most notice from your tweets and connecting with your followers and industry more closely. That level maintains a professional feel but again being able to become personal with your customers and industry is incredibly powerful for a company’s public relations.
Have all your activities reflect these points and connect with your audience and your industry on a level like no other!
No related posts.
https://creativeagencysecrets.com/wp-content/uploads/2014/04/CAS_Logo_1line_RGB.jpg00Creative Agency Secrets Teamhttps://creativeagencysecrets.com/wp-content/uploads/2014/04/CAS_Logo_1line_RGB.jpgCreative Agency Secrets Team2013-10-22 17:00:242022-12-19 11:57:06How to be a successful Twitter manager
Google’s new update – Hummingbird has changed Google’s algorithm. Fortunately, there are SEO properties that have and will remain constant. This article will illustrate the easy way to ensure your website is run optimally for both man and machine – the visitor and Google’s bots (crawler).
What you’ll find in this guide are a more concrete set of guidelines which are unlikely to change in the near future.
This means, delicate topics such as keywords and keyword density etc will not be discussed in this article as the rules surrounding them are prone to change.
As many of you will be aware, search engine optimisation is often about making small modifications to parts of your website. Only when viewed collectively will results begin to be noticeable – so don’t give up early on is the moral of the story.
Without further ado – The DOs and DON’Ts of SEO.
Page Titles
Page titles should define in a few words the content of the page. Effective page titles draw visitors to your site and give an indication to search engines the context of the page’s content.
Do: Choose a title that effectively communicates the topic of the page’s content
Don’t: Choose vague titles that have no relation to the content on the page or a default title such as “New Page 1”.
Metatags and Descriptions
Metatags and descriptions allow you to describe and/or summarise your pages content. Descriptions will be the snippet provided by google to help the visitor determine the value of the page before opening it. The text in the red box below is what the user sees.
Do: Write a description that would both inform and interest users if they saw your description as a snippet in a search result.
Don’t: Write generic descriptions or use only keywords. Although no longer common, people have been known to paste an entire paragraph as the description.
Don’t: Repeat the same tags and descriptions across multiple pages.
URLs
*Changing your URL structure is not a small job! If it is ok currently then leave it as is.
Page URLs are often a difficult thing to effectively change if you’ve got a large website and/or have been using it heavily for a while. The reason for this is by changing the structure, all previous links will no longer work. The quick fix is of course to set up a redirect however this is far from ideal – to best utilise your site’s existing SEO capabilities you would have to correct all of the links. You’d probably still have to set up a redirect anyway as external sites linking to your page would also stop working.
Do: Your URL should contain words which are both relevant to your site and the individual page the URL links to.
Don’t: Choose generic page names such as “page1.html”
Don’t: Use unnecessary parameters/ID numbers
Don’t: Use excessive keywords, else risk getting the individual URL or even the whole site banned by Google.
Navigation
The menus on your site help visitors navigate your site. They also provide a template for creating an effective XML Sitemap which will help bots crawl your site. Having an effective menu layout is a win-win situation.
Do: Create a natural flowing hierarchy which makes it as easy as possible for visitors to navigate your site.
Do: Use text for navigation as often as possible – not everything has to be in a dropdown menu!(what this means is that often you can navigate visitors to other pages effectively using text on the page as opposed to everything being exclusively in the menu)
Do: Submit an up to date XML Sitemap to Google for both your main site and any mobile sites you may have – (update regularly)
Do: Have a useful 404 page. Many 404 pages simply have an error. Include a link back to a useful page such as your home page or main news page.
Don’t: Create a difficult, complex linking structure by either linking to too many things (that the visitor is unclear what to click) or by breaking your content up (so to increase number of pages but the visitor has to visit multiple pages unnecessarily)
Don’t: Have a navigation system based entirely on dropdown menus. As mentioned before, not only can this be frustrating for the user, it also has adverse SEO consequences.
Keep Your Text Easy To Read
Obvious really – the DON’Ts however will explain how Google can punish you for making your content hard to read.
Do: Write content that is easy to follow, concise and organised by using formatting options such as headings, bullet points etc
Do: Create fresh, unique content which is designed for your users, not search engines.
Don’t: Overuse headings/bolds/italics etc
Don’t: Use pictures to replace words. Pictures aren’t read by search engines which reduces SEO friendliness. Pictures also make it difficult for readers to copy/paste from your site (which although you might think this is a good thing, many would argue that the purpose of the internet is to share information).
Don’t: Deceptively hide text from users but displaying it to search engines (Such as having white text on a white background).
Links
Links on your page (both internal and external) are an important way of guiding visitors around your site. They also however help Search Engines decipher the page’s content and purpose.
Do: Try and describe what the link is linking to in the text. Hyperlinking keywords or phrases which define the link’s purpose will both help your visitor and Search Engines know what the link is pointing to.
Do: Format links so they are easy to spot (don’t try and trick visitors into thinking that normal text is actually a link). This means highlight them with a different colour.
Don’t: Use generic anchor text such as “click here”.
Images
Images help beautify a site. They also slow down loading speed so only use them sparingly and avoid using high-definition photos unless needed. Slow sites appear lower on Google’s search results.
Do: Use brief, descriptive filenames and alt text. This will help search engines know what the picture is about and will serve a double purpose if the picture doesn’t load, the visitor will know what should’ve been there.
Do: Supply alt text when using images as links. Similar to what was said in the Link section of this article to help describe the link.
Don’t: Stuff keywords into the alt text – it can get you blacklisted from Google!
Don’t: Use only images as links for your site’s navigation
Don’t: Overuse high-def images as this will significantly reduce site speed
Headings
Headings should be used to help visitors scan your page for the applicable information. Avoid using them for unimportant content.
Do: Use headings as an outline – the reader should be able to read just the headings and have a clear understanding of what the page is about.
Don’t: Place headings that don’t help clarify the page’s structure and summarise the page’s content
Don’t: Erratically change heading tag sizes or put all of the page’s text into a heading tag.
Don’t: Use heading styles when italics or bolding may be more appropriate
Robots.txt
Robots.txt files tell search engines what to crawl and what to ignore. Used effectively, they can help bots crawl your pages more effectively and reduce spam. Used incorrectly – your whole site could disappear from Google. To find out more about Robots.txt files and how Google utilises them, check Google’s developer pages
Do: Have an up to date robots.txt file – perhaps even a second if you’re attempting to block ssl pages.
Don’t: Allow search result-like pages to be crawled.
Don’t: Allow URLs created by proxies to be crawled.
Promoting Your Site On Google
There are many ideas you can utilise to appear on Google. So long as you don’t spam or buy your links – you should be fine.
Do: Sign up for Google Places if appropriate to appear on Google Maps and web searches.
Do: Include your website URL in all of your online mailings (blogs, newsletters and social media posts).
Do: Guest blog and comment on other’s sites with links back to your own.
Don’t: Sign up for schemes where your content is artificially promoted to the top of selected services.
Don’t: Purchase links from another site with the aim of getting PageRank instead of traffic.
Don’t: Spam link requests to all sites related to your topic area.
Do: Use it regularly to keep up to date with how Google’s bots see your site and whether there are any issues which can be resolved to make your site appear higher.
Do: Rectify any issue which Webmaster tools suggests.
Do: Utilise analytics and other tools available to optimise the most visited pages and help navigate users around your site.
Don’t: Do anything reckless which you don’t fully understand – you could block your entire website from appearing on Google if care isn’t taken.
No related posts.
https://creativeagencysecrets.com/wp-content/uploads/2014/04/CAS_Logo_1line_RGB.jpg00Creative Agency Secrets Teamhttps://creativeagencysecrets.com/wp-content/uploads/2014/04/CAS_Logo_1line_RGB.jpgCreative Agency Secrets Team2013-10-21 14:22:422022-12-19 11:57:05The DOs and DON'Ts of SEO - The Easiest Way To Appear On Google
Ever got an introduction to a new business prospect and wondered why they didn’t reply to your email enquiry?
Let us show you how to guarantee they read your message
Scenario: Rebecca (that’s me) introduces you to Jonathan Lewis. Hey, you should meet Jonathan, I’m sure you guys could work together.
What happens next is one of three possibilities
Rebecca emails Jonathan and cc you into the message – this is the best possible next step because Rebecca is known and trusted by Jonathan so he’ll open the message and see the introduction. PLUS you are cc so he gets your email and you see his and can reply direct keeping Rebecca cc if appropriate.
Rebecca says she’ll email Jonathan and ask him to get in touch – this is the worst possible next step because you have no control over whether she does it, what she says, you don’t get Jonathan’s email address and you don’t see the message. AVOID
Rebecca gives you Jonathan’s email so you can get in touch – this is the median situation. Your message will arrive in his in-box but he doesn’t know you, your email address won’t be white-listed and you risk being ignored
How to overcome scenario 3 above.
Your email subject line is critical
Writing this email is important – it’s your one big chance for Jonathan to notice you and make direct contact.
Ready for the perfect subject line?
Subject: Rebecca Caroe
Yes – that’s it. Make the introducer’s name the subject of the message – this will grab their attention and they will surely notice your message. Why is he writing to me about Rebecca? Hey, I know Rebecca maybe that’s news about her?
Dear [First Name]
Rebecca Caroe and I met this week and we were talking about [name the project / expertise] and she has recommended you and I connect. Her reason is that we are [state your business] and we need [state their business].
Can we fix a time to speak. I am available on [name 2 dates and times here – at least 3 days ahead of today].
Very much looking forward to learning more about [name their business].
[your name]
Why this email works
It sets the context quickly – it does all the ‘thinking’ for the recipient.
You should be trusted with one phone chat or meeting because of the mutual connection (Rebecca) and you’ve given them an easy route for the reply message by suggesting the dates.
Go on, try it and tell me whether it worked for you!
September is the time business gets down to work after the summer break. Blair Enns at the Win Without Pitching team say this is the perfect time to clean out your list of prospects and new business opportunities.
Find out which ones are going to buy and which aren’t worth your time chasing further. Blair writes
Below is a simple email template that you can use to raise deals from the dead. It works throughout the year but this week, more than any other period in the calendar, is when it works best.
THE EMAIL
It was taught to me as The Takeaway but I refer to it by the subject line that I prefer: Closing The Loop. Draft it, modify it if you dare, but send it to all those prospects you were talking to over the summer about real projects only for them to disappear on you. That’s the intended purpose of this email – to raise deals from the dead and solicit a response from someone who has been avoiding you over the summer.
Your natural inclination is probably to do the opposite of what I’m about to suggest. Resist. Do not send an overly polite email. Do not make excuses for your prospect’s behaviour over the last few weeks. Do not email in pursuit of a yes or even an answer. No, your mission is to strip away all emotions and matter-of-factly just let your prospect go. Below is how to do this and then what to expect afterwards.
https://creativeagencysecrets.com/wp-content/uploads/2014/04/CAS_Logo_1line_RGB.jpg00Rebecca Caroehttps://creativeagencysecrets.com/wp-content/uploads/2014/04/CAS_Logo_1line_RGB.jpgRebecca Caroe2013-09-03 10:00:002020-01-24 01:44:28New business development copywriting: Stalled prospects
Facebook hasn’t replaced any newsletter (at least not yet but you never know what Facebook’ll do next). What Facebook has done is equal the amount of traffic driven to our website from our weekly newsletter. And helped us to recruit new opted-in newsletter subscribers.
Better yet – it’s all free.
Key things to note: Our weekly newsletter has over 4,500 subscribers. Our Facebook page had just 400 (over the course of this experiment we increased this to 550). Wow – that’s ten times fewer subscribers but they’re visiting and re-visiting the website.
Everyone knows the theory of email newsletters – their open and clickthrough rates so I won’t waste time here. We’re going to tell you how you can drive more traffic to your website from Facebook. Then invite visitors to join the newsletter.
What we were doing
We posted 3 times a day on Facebook, for Facebook – all of which was shared from other users and pages on Facebook. These posts were backed up by regular blog post entries (one every day) which were automatically fed to our Timeline. Very standard.
So what did we change?
There were 3 major changes.
The first was to do with posting amounts and timing. We increased the frequency of posting and changed what time of day we posted Facebook updates. This was increased to 5-6 times a day (effectively doubling our previous posting frequency).
The second major change is where we post from. We changed all sources of our posts to our website and then linked to them.
Our third major change was where we sourced our content from. It’s important to note here we hardly ever created original content – we either shared others or repurposed our archived content.
To facilitate changing the source of our posts to our website we installed new plugins. People will spend less time on our Facebook page because we are directing them to our website. As a result, many of the plugins we installed were to make sure our content is still shared (which often doesn’t happen once you leave a social media site). As we knew many of our visitors would also be arriving from a mobile device (Facebook’s App is becoming more widely used) we paid particular attention to how our site looks on mobile devices.
Step 1: Smarter Posting Times
Our audience is active at all times of the day. We were initially posting 3 times daily between 9am and 5pm – Not the smartest move when you look at the graph below of our visitor traffic over 24 hours.
Click To Enlarge
For this reason – we opted to post every 4-5 hours. Remember – we don’t want this to take up all our time and we definitely don’t want to be up all night so we chose to schedule our Facebook posts. To enable auto-posting of blog at all times of day we installed new plugins which I’ll discuss below.
Step 2: Make The Website The Destination
We want to drive traffic off Facebook to our website. This is marketing real estate that we control and manage. We’re not dependent on Facebook’s grace. Making most of your posts direct to your website is therefore logical. And remember our objective is to drive readers from Facebook to becoming opted-in newsletter subscribers.
This of course means publishing content designed for Facebook on your website. Whether you’re sharing an article or a photo, upload it to your site (add a link on the post to credit the photograph if appropriate). Don’t just link them straight to the original source, ideally you’re seen as the source of the content so they spend longer on your site and less elsewhere.
With our new plugins – photos are uploaded from our website to Facebook automatically. When a user clicks on a photo expecting it to enlarge they are instead redirected to our website (where there is a larger image front and centre). Bingo – we’ve just driven traffic from Facebook to our site. From here you have 2 challenges –
How can they share this with their friends?
What’s going to keep them from leaving your site?
The first challenge is easily answered – plugins which I will discuss later on. The second is to have an attractive website littered with quality content – this is discussed just below.
Step 3: Sourcing Quality, “Original” Content
To ensure our content is appealing, we need it to be socially shareable. While there are no guarantees, using already proven socially shareable content is a start. But you don’t want to appear a copycat. So how do you get proven socially shareable material while still looking “fresh” and “original”? The easiest strategy is to find content from sources other than Facebook. Pinterest was a great resource for me as pictures make the best Facebook posts and most photos came with a short description or piece of information – perfect.
Setting Up Your Website: Plugins Used
Below is a list of the plugins you’ll want to install if you’re on WordPress. I’ve described the types of plugins you want before stating what plugin we used. These plugins are all free and you may have your own preference.
New Automatic Posting To Social Media (Facebook/Twitter).
NextScripts: Social Networks Auto-Poster [Hands down the best autoposter plugin. Fully customisable, plenty of social media options and looks like the posts were shared straight from Facebook. 2 great features of this plugin are that you can choose individual posts to be image posts or linked posts etc & Imports Facebook comments so your website appears popular]
A more simple “Like Us” button further up the News main page.
Facebook Social Plugin Widgets(This plugin installs widgets to be used wherever – we used them in the sidebar of our blog page [note page and not post])
When someone enters our site (for the first time) a like us on Facebook plugin pops up [This doesn’t interfere with our pre-existing Newsletter signup popup].
So what were the results of our changes? The graph below reveals all. With a simple change in the frequency and timing of posts our weekly reach exploded. This is most likely due to reaching more individuals as opposed to reaching the same people multiple times.
Click To Enlarge
Results of Our 2nd Change
The screenshot below is of our website’s referrals for the 2 week period before and during our Facebook efforts. As you can see, vast improvements. We basically received 1000 extra page views each week (remember, at the time we only had 400 people liking our page). I’ve highlighted the Twitter referrals as well (t.co) as although we designed this campaign for Facebook – using the NextScript Autoposter plugin we also published the same content to Twitter (although we changed the structure of the titles and links etc from within the plugin’s settings). You’ll notice the amount of referrals we got from Facebook Mobile (m.facebook.com). Good thing we had WPtouch installed so our page would look good on any device.
Click To Enlarge
Did Our Plugins Do Their Job?
I was initially skeptical when installing the Facebook Page Promoter Lightbox – no one likes popups. After 2 weeks though, we picked up 50 likes from external “Like” buttons. These buttons were only in 2 places, the first was in the sidebar on the blog page the second was the aforementioned lightbox. I’m almost 100% sure the lightbox is where we picked up all of those likes.
Click To Enlarge
Sling pic and both social sharing bars (vertical and horizontal) picked up a few extra “Likes” and retweets which was nice – nothing to write home about but every little bit counts. WPtouch can be attributed to the 13 mobile likes as although it means people liked our Page from Facebook (on a mobile device), the website must have been attractive enough to have convinced them.
Conclusion
The initial results are all very promising, only time will tell how good a long term strategy this is. The short term gains were an instant increase in likes going from 400 to 550 in 2 weeks, engagement going up and a large increase in unique visitors and page views. There were of course more minor, intricate strategic choices made during this period and still being made now – these will be discussed in a later post.
If you’d like any help setting these plugins up or want to discuss how this can apply to your online strategy get in touch by leaving a comment below.
 Social Media is the “in” thing. We often say to our clients – where are your customers? If they aren’t using Twitter or Facebook then why bother using it for business purposes?