With more people opting for anonymous website browsing it is becoming increasingly harder to see how users find your site – in particular, which keywords they searched with.
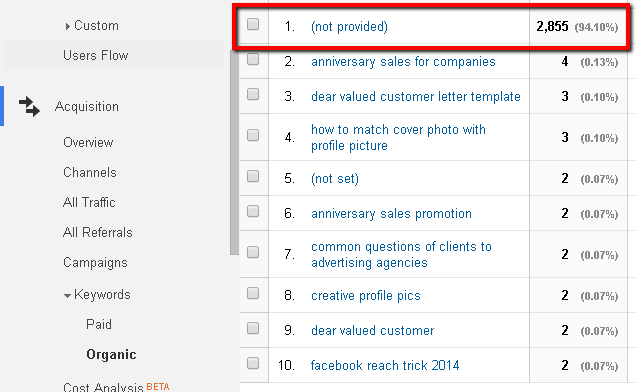
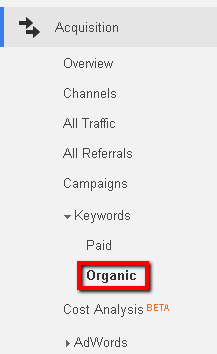
Inside your Google Analytics you can see which search terms prospects are using to find your website by going to Acquisition -> Keywords -> Organic in the left sidebar menu.
With the rise of anonymous browsing, Google Analytics can no longer provide useful and therefore accurate keyword search data. You’ll more than likely see the majority of your keyword searches is “(Not provided)”.
This situation is getting worse month by month as we track the analytics for our website.
By following these steps, we can show you a workaround which will remove the dreaded “Not Provided” data and give you greater insight into how visitors are finding your site. Best of all, this workaround will also show you what keyword searches you are appearing in but not getting traffic from.
The Workaround For Keyword Searches
Although not a perfect replacement, Creative Agency Secrets has found a work-around which can give you a good indication of what search words and phrases your website is showing up for and which are drawing visitors.
It involves Google Webmaster Tools – You have to set this up for your website if you haven’t already.
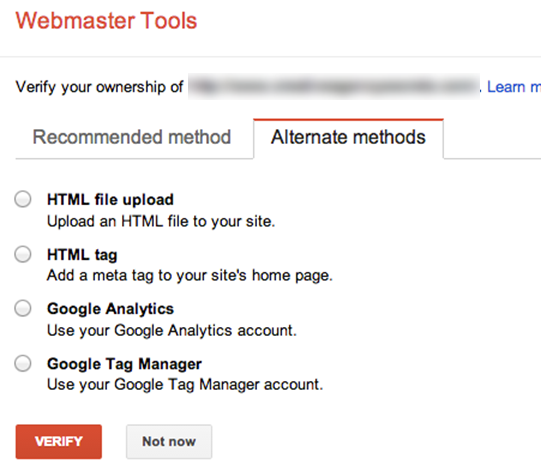
Set up and Verify yourself and your website in Webmaster Tools – generally the easiest way is to do this with your analytics account. If this fails, Google helpfully provide short how-to’s on the other methods of verification.
Remember your site must be using the asynchronous tracking code.
Select the Google Analytics radio button (which can be found under the “Alternate methods” tab) and click Verify.
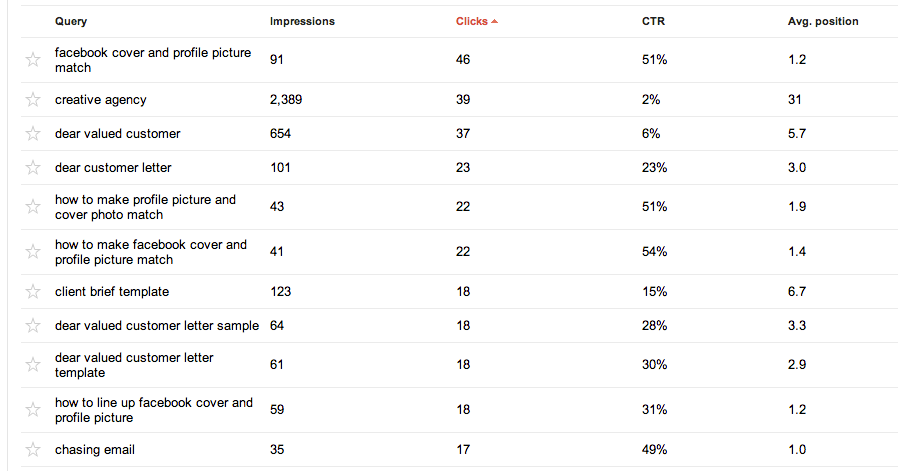
Now navigate to Search Traffic in the sidebar menu and select Search Queries.
Scroll down below the graph you will see a list of Queries used and the Impressions. The main benefit of this data is you can see the Average Position your site has in search listings for each one (far right column).
We are going to show you how to send this data to your Google Analytics account but it’s worth noting that there is more accuracy in this screen as Google Analytics rounds the numbers.
Link Google Analytics To Webmaster Tools
Now re-open Google Analytics and browse to your website dashboard.
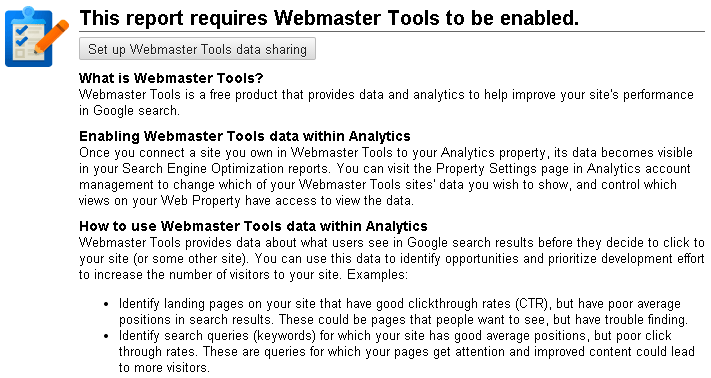
In the side menu go to Acquisition -> Search Engine Optimization -> Queries. You will get a message advising you to enable Webmaster Tools (see screenshot below).
Click the button to Set up Webmaster Tools Data sharing at the top of the page.
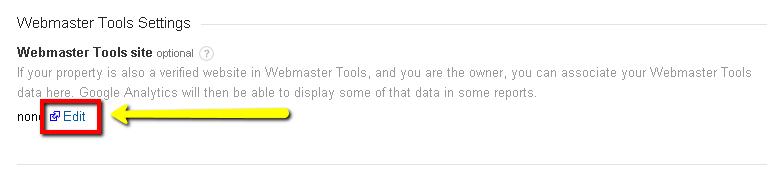
Leave all the settings it displays as default although you can change the fields if some are incorrect e.g. Industry Category. At the bottom of the page the sub-heading Webmaster Tools Settings click the Edit hyperlink.
This will bring up a list of site(s) and associated Analytics web properties. Choose your site on the left radio button and Save.
Click OK to Add association in the next window.
View The Data
You’ll be directed to the Admin screen. Click Reporting in the top menu to return to GA and again go to Acquisition -> Search Engine Optimization -> Queries.
You should now see a summary graph and below it the list of keyword queries , impressions, clicks and average position of your website.
For everyday use, we find the Google Analytics summary data is fine. But for non-rounded data, go into the Google Webmaster Tools display to get the full picture.
Note that data is normally 2 days behind on these searches compared to other metrics in Google Analytics.
Are you a tradesman – plumber, electrician, carpenter, builder – and want to do some marketing to get more customers? We had a meeting today with a new client and talked about marketing.
There are lots of choices in marketing, but for a tradesman’s business, there are actually only 3 marketing tools they need
Business cards
A website
A mailing list (email or postal)
Let’s run through these and how to use them
Tradesman’s business cards
Cheap to design and print, these are your number 1 marketing tool when you first start. They should have accurate information about how to contact you printed in large type with a recognisable business name.
How tradesmen use business cards
Hand two to every customer. One to keep and one to give to a friend.
Keep them in your wallet, in the car glove box and hand them out liberally especially if you go to a social function or belong to a networking group or business meeting group.
A tradesman’s business website
When you’ve enough cash, buy a website. A simple 5 page site is all you need to start off.
How tradesmen use a website
It needs to have
a header that says your company name and phone number,
a home page that describes your business and the geographic area in which you work,
a page with your full contact details,
a page to describe your specialist skill,
a page of customer testimonials,
a page about you and your team.
A tradesman’s mailing list
Once you’ve been working for a while, you will send out invoices to get clients paying you. This is your chance to start to grow a mailing list. This is useful because your past clients may refer you to future clients, and sending out mailshots or newsletters serves as a reminder to people about your services, and how to contact you.
How a tradesman uses a mailing list
Keep a record of every customer name, business name, address, telephone and email when you raise an invoice. If you use an accounting software programme, it’ll save these details for you.
When you get a phone call or email enquiry for a new job, save the contact details. Check on the phone that you have spelled their name correctly – this is particularly important for email addresses because one wrong letter and the message won’t arrive.
When you do a job quote, save the contact details.
Every month collate all these lists into one place (preferably electronic). Save the file with an obvious name e.g. August 2014 Mailing List. Then send out a short message to the whole list using specialist email sending software like MailChimp/AWeber/FeedBlitz. DO NOT USE your email program. Ask me why not if you don’t know.
Put the date in your diary to send the newsletter every month for 1 year.
Stick to the schedule.
Send that mailing.
Even if it is short and has one photo of a job you’ve done (before and after photos are great), or a customer testimonial – it all adds up. Over time you will get to having a big list.
Say you do 10 jobs a month and meet 5 new people each month who take a card. Within 5 years you’ll have over 900 names on your list. If you do 20 jobs a month and meet 10 new people – you get to 900 names in half the time!
That is it.
There are additional marketing techniques that you can add on top of the basic 3 such as outbound mail campaigns, using recommended trades services (Builders Crack, Rated People), creating website landing pages for Yellow Pages and other directory listings, customer satisfaction surveys, freebie giveaways or seasonal special offers.
But don’t do these until you have the basic 3 covered and working well.
For tradesman marketing services, call Creative Agency Secrets – outsourced marketing for busy business owners.
No related posts.
https://creativeagencysecrets.com/wp-content/uploads/2014/04/CAS_Logo_1line_RGB.jpg00Rebecca Caroehttps://creativeagencysecrets.com/wp-content/uploads/2014/04/CAS_Logo_1line_RGB.jpgRebecca Caroe2014-08-07 16:22:542020-01-24 01:44:55Top tips for marketing Tradesmen
Many content marketers rely on Google Alerts as a way of getting ideas for content, seeing what your competitors are doing online and for those vain enough – seeing what others are publishing online about you.
Google has recently “beautified” their Alert service – there’s no telling just yet whether they’ve changed anything behind the scenes.
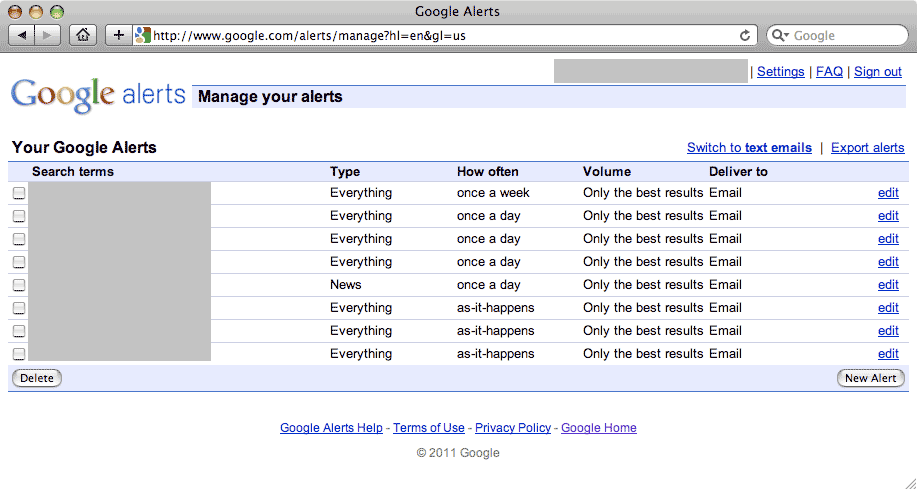
The Old Google Alerts
Old Google Alerts
Above is a picture of what Google Alerts used to look like – functional, but not the simplistic approach Google is taking.
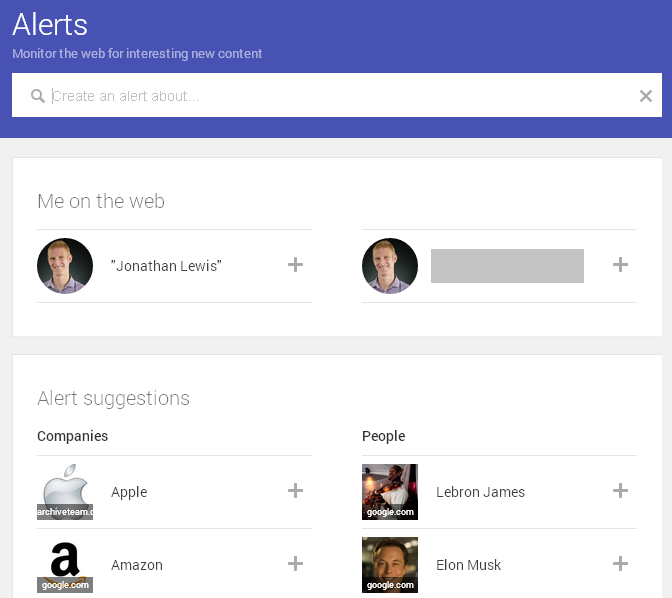
The New Google Alerts
The first thing you’ll see when you check out Google Alerts is the friendly and more stylised design, however the big changes come with Google’s suggestions.
The suggestions are based off who you’ve added in your circles in Google+, again this emphasises the importance Google is placing on G+. The better you utilise Google+ the better the suggestions Google will offer.
Google have also added a “Me On The Web” section – something we recommend all of our clients to do. It is always intriguing to see what others are posting about you online (if anything).
*Remember if you’re using a unique (individual) Google account to add your company or your client’s companies – Google isn’t quite clever enough to auto-suggest them at this stage.
New Google Alerts
No related posts.
https://creativeagencysecrets.com/wp-content/uploads/2014/04/CAS_Logo_1line_RGB.jpg00Creative Agency Secrets Teamhttps://creativeagencysecrets.com/wp-content/uploads/2014/04/CAS_Logo_1line_RGB.jpgCreative Agency Secrets Team2014-07-28 10:45:162014-07-28 10:49:07Google Alerts Has Been Updated
SEO is an important part of an online administrator or digital content manager. An effective website is not just appealing to human visitors – they are also be easy for online spiders and bots to understand and “crawl” their content.
That is why XML Sitemaps are important – They tell the machines where each page can be found, how important each page is relative to the rest of the site and how often it is updated/changed.
Through the use of simple plugins (or manually accessing the file if you’re more technically competent) a sitemap can be created and modified. By modifying the file (robots.txt), you can change how often robots should crawl your site for specific URLs, change the priority setting of an individual page or even block the bots from crawling certain pages altogether. A situation I often do this for is if we have historical blog posts that continue to be heavily trafficked. I’ll want to increase the priority of those posts slightly higher than newer ones so as to ensure they continued to be crawled and that any change that’s made is more likely to be picked up by Google and Bing.
Sitemaps can easily be edited to tell crawlers which pages are worth crawling and which are to be ignored – particularly if you use a pre-designed sitemap.
Which WordPress Plugin Is Best For Sitemaps?
If you’re one of the millions of web admins who use WordPress, I highly recommend the Google XML Sitemaps plugin by Arne Brachold. It is easy to setup and best of all, is very easy to manipulate should you wish to feature a particular page or skip another. It also makes a robot-friendly URL (ours is https://creativeagencysecrets.com/sitemap.xml) meaning it is good for your SEO too.
How Optimise Your Sitemap’s Effectiveness
Ultimately there is no point in creating a sitemap if it’s not easily crawlable by robots such as Google. Therefore, testing and uploading your sitemap using Google Webmaster tools is logically the next step.
Go to Google Webmaster Tools and add your site. Usually, the easiest way to verify your site is to use your Google Analytics logins. If this doesn’t work or you wish to set up an account without access to Google Analytics, you may have to upload an html file to the site.
Upon verifying your site, click Sitemaps in the left menu which can be found under the “Crawl” section. Next, Add/Test your sitemap by clicking the “Add/Test Sitemap” red button in the top right of the screen.
In the textbox that appears, assuming you haven’t changed the default URL (I’d recommend you don’t), all you should have to enter is “sitemap.xml”. Google will then check to ensure it’s a valid URL and will alert you if there are any problems it detects (see screenshot below) – fortunately, Google also provides explanations as to what causes these errors which usually helps get to the root cause of the problem quickly. Normally though, a first time, clean installation won’t have any issues. Errors are usually caused if your website has been around for a while – especially if the URL structure of your site has changed or you’ve manually changed URLs of certain pages post-publication.
Click To Enlarge
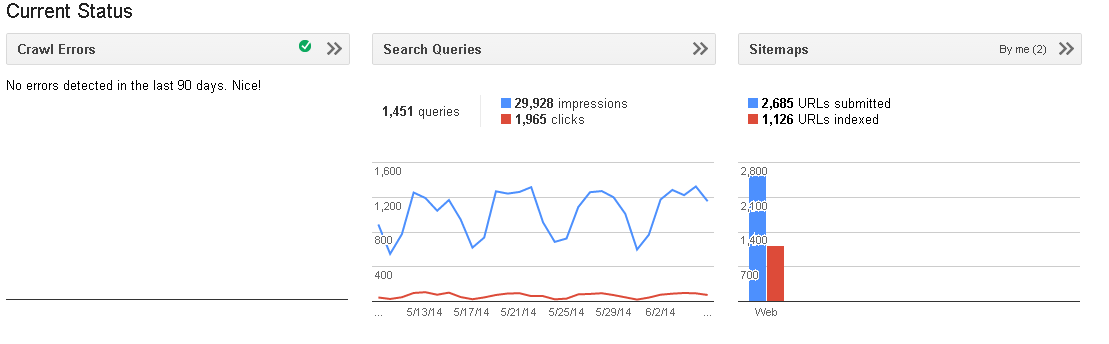
Hopefully though there are no major errors and that you’re able to fix all minor issues. Google will show how many pages you’ve submitted (it naturally skips certain ones like eCommerce pages) and how many it’s actually indexed. Remember, the more pages Google indexes, the better Google knows your site and the more likely it is to send genuinely interested visitors to the pages you want them to visit first time.
Success
Click To Enlarge
No related posts.
https://creativeagencysecrets.com/wp-content/uploads/2014/06/Google-Webmaster-Tools-Logo.jpg344495Creative Agency Secrets Teamhttps://creativeagencysecrets.com/wp-content/uploads/2014/04/CAS_Logo_1line_RGB.jpgCreative Agency Secrets Team2014-06-10 12:44:402014-06-12 09:17:25Google XML Sitemaps Increase your SEO - Check Now
In a previous article, we discussed ways in which you can promote a business anniversary. Recently, one of our clients celebrated their 10th year in business. To celebrate, we did three things. We created an eBook to highlight the changes in the industry over 10 years and where the next 10 years may take them, a timeline to show the company’s milestone achievements and a classic anniversary sale.
What must be remembered is that an anniversary is not just a giveaway to thank your customers/fans. It’s also a great opportunity to get closer to your customers, generate more sales and build your future audience.
The eBook
The eBook was created to give readers a summary of the major changes in the industry in the past decade as experienced by influential individuals within the industry. The changes were analysed by 10 expert individuals who are heavily involved in the industry but all play a different role. This provided an interesting range of insights, each focussing on a different area of the industry.
The eBook was promoted predominantly on Social Media and on their blog. A large portion of the social media audience and website visitors are not on the mailing list – and ultimately, the purpose of the eBook was to generate newsletter signups.
To download the eBook, customers had to enter their email address whereby they would be both sent the eBook instantly as well as added to the mailing list if they weren’t already on it. This was achieved using an autoresponder. In the email with the eBook, we also mentioned the anniversary sale and gave them the discount code.
The Sale
10 years in business, 10% off everything – hence the discount code “10years10%”. In the previous article, we mentioned that there were a variety of sale options to choose from (historical pricing, free shipping, free gift per $10 spent). We chose to utilise a simple 10% off by process of elimination. The products our client now sells are very different to the ones they sold 10 years ago so a historical pricing promotion (where the prices would be what they were 10 years ago) wouldn’t be nearly as effective. As the value of the products is quite high, but the products are generally small, free shipping is not a big incentive as it usually equates to a minimal discount. The free gift per $ spent option was ignored for a similar reason; no one wants 100 caps with every order.
The code was promoted front and centre on the client’s homepage, on their social media accounts, those who downloaded the eBook and to their existing mailing list.
The 10% discount code was enabled for 10 weeks, which not only tied in to the 10-year theme but also allowed enough time for anyone who was going to use it, to use it. We also left the coupon open for unlimited uses – if someone wanted to buy something then use the same code again a couple of weeks later, they could.
Timeline
A timeline is a nice, visually attractive way of showing progression. Although they can be complicated and contain too much information, simply picking 10 most important events to highlight is a simple way of avoiding clutter and confusion. We therefore chose to feature just the big product redesigns, new releases, and company milestones (such as the 5000 unit produced) during their 3652 days in business.
To make a timeline easily which can be featured on your website, I’d recommend TimelineJS. TimelineJS is a free, opensource tool, which enables you to build interactive timelines from a Google Spreadsheet. The great thing about TimelineJS is it can be embedded into any website.
The results
Our client’s mailing list increased (ironically) by 10%. The number of downloads for the eBook however was considerably more than those that were newly signed up. This is because those already signed up to the mailing list were sent links to the eBook directly for download – they didn’t have to re-fill in their details unnecessarily.
The client received a number of sales utilising the 10% off discount. Surprisingly though, even though the code featured largely on the homepage, social media and in the text to those who received the eBook, there were still a handful of people who paid full price.
My name is Johan Ericson and I’m a marketing student from Sweden. I’ve just completed a three-month internship at Creative Agency Secrets and feel that in a short space of time I’ve learned a lot. Aside from having the benefit of getting to know the people and work environment at CAS, I got to experience how a marketing agency works in the real world. With a broad range of daily activities and interesting one off tasks, I quickly found myself dealing with actual work for actual clients. Some of the skills I have developed during my time at Creative Agency Secrets:
Blogging: One of the first things I did as a intern was to start a blog, “The Intern“. Through this assignment I learned how to use WordPress as well as learning to write and when to publish my content.
Social Media: Having managed multiple Social Media accounts for clients across a range of mediums in Social Media (Facebook, Twitter, LinkedIn). I’ve learnt some of the theory behind Social Media (what to post, when to post etc) as well as some of the technological tricks you can use to drive traffic back to your website. Learning both the theoretical and technological aspects of Social Media have helped develop my skillset and increased my competence in this area.
Google Analytics: During my time, I’ve learnt how website success can be measured. I’ve learnt about the importance of reducing bounce rate, and how the information gained from analytics helps make websites better for both the user and the administrator.
Client Meetings: After spending time with clients and planning and preparing for meetings, not only has my level of comfort increased in these situations but I also have gained a greater understanding of the needs and pressures potential clients have which allows us to help them better.
Marketing Tools: During my time with Creative Agency Secrets, I’ve learnt to use many different marketing tools. This has allowed me to better help clients and broaden the range of skills and services I can now offer.
During the brief time I spent at Creative Agency Secrets I feel I’ve learnt a lot and gained a well-rounded experience. I’ve developed my skillset and have a better understanding to real life marketing which will help me to take the next step forward in my career.
No related posts.
https://creativeagencysecrets.com/wp-content/uploads/2014/05/JohanCarlosEricson.jpg500500Johan Ericsonhttps://creativeagencysecrets.com/wp-content/uploads/2014/04/CAS_Logo_1line_RGB.jpgJohan Ericson2014-05-16 10:02:092020-01-24 01:44:55Internship at Creative Agency Secrets
Facebook hasn’t replaced any newsletter (at least not yet but you never know what Facebook’ll do next). What Facebook has done is equal the amount of traffic driven to our website from our weekly newsletter. And helped us to recruit new opted-in newsletter subscribers.
Better yet – it’s all free.
Key things to note: Our weekly newsletter has over 4,500 subscribers. Our Facebook page had just 400 (over the course of this experiment we increased this to 550). Wow – that’s ten times fewer subscribers but they’re visiting and re-visiting the website.
Everyone knows the theory of email newsletters – their open and clickthrough rates so I won’t waste time here. We’re going to tell you how you can drive more traffic to your website from Facebook. Then invite visitors to join the newsletter.
What we were doing
We posted 3 times a day on Facebook, for Facebook – all of which was shared from other users and pages on Facebook. These posts were backed up by regular blog post entries (one every day) which were automatically fed to our Timeline. Very standard.
So what did we change?
There were 3 major changes.
The first was to do with posting amounts and timing. We increased the frequency of posting and changed what time of day we posted Facebook updates. This was increased to 5-6 times a day (effectively doubling our previous posting frequency).
The second major change is where we post from. We changed all sources of our posts to our website and then linked to them.
Our third major change was where we sourced our content from. It’s important to note here we hardly ever created original content – we either shared others or repurposed our archived content.
To facilitate changing the source of our posts to our website we installed new plugins. People will spend less time on our Facebook page because we are directing them to our website. As a result, many of the plugins we installed were to make sure our content is still shared (which often doesn’t happen once you leave a social media site). As we knew many of our visitors would also be arriving from a mobile device (Facebook’s App is becoming more widely used) we paid particular attention to how our site looks on mobile devices.
Step 1: Smarter Posting Times
Our audience is active at all times of the day. We were initially posting 3 times daily between 9am and 5pm – Not the smartest move when you look at the graph below of our visitor traffic over 24 hours.
Click To Enlarge
For this reason – we opted to post every 4-5 hours. Remember – we don’t want this to take up all our time and we definitely don’t want to be up all night so we chose to schedule our Facebook posts. To enable auto-posting of blog at all times of day we installed new plugins which I’ll discuss below.
Step 2: Make The Website The Destination
We want to drive traffic off Facebook to our website. This is marketing real estate that we control and manage. We’re not dependent on Facebook’s grace. Making most of your posts direct to your website is therefore logical. And remember our objective is to drive readers from Facebook to becoming opted-in newsletter subscribers.
This of course means publishing content designed for Facebook on your website. Whether you’re sharing an article or a photo, upload it to your site (add a link on the post to credit the photograph if appropriate). Don’t just link them straight to the original source, ideally you’re seen as the source of the content so they spend longer on your site and less elsewhere.
With our new plugins – photos are uploaded from our website to Facebook automatically. When a user clicks on a photo expecting it to enlarge they are instead redirected to our website (where there is a larger image front and centre). Bingo – we’ve just driven traffic from Facebook to our site. From here you have 2 challenges –
How can they share this with their friends?
What’s going to keep them from leaving your site?
The first challenge is easily answered – plugins which I will discuss later on. The second is to have an attractive website littered with quality content – this is discussed just below.
Step 3: Sourcing Quality, “Original” Content
To ensure our content is appealing, we need it to be socially shareable. While there are no guarantees, using already proven socially shareable content is a start. But you don’t want to appear a copycat. So how do you get proven socially shareable material while still looking “fresh” and “original”? The easiest strategy is to find content from sources other than Facebook. Pinterest was a great resource for me as pictures make the best Facebook posts and most photos came with a short description or piece of information – perfect.
Setting Up Your Website: Plugins Used
Below is a list of the plugins you’ll want to install if you’re on WordPress. I’ve described the types of plugins you want before stating what plugin we used. These plugins are all free and you may have your own preference.
New Automatic Posting To Social Media (Facebook/Twitter).
NextScripts: Social Networks Auto-Poster [Hands down the best autoposter plugin. Fully customisable, plenty of social media options and looks like the posts were shared straight from Facebook. 2 great features of this plugin are that you can choose individual posts to be image posts or linked posts etc & Imports Facebook comments so your website appears popular]
A more simple “Like Us” button further up the News main page.
Facebook Social Plugin Widgets(This plugin installs widgets to be used wherever – we used them in the sidebar of our blog page [note page and not post])
When someone enters our site (for the first time) a like us on Facebook plugin pops up [This doesn’t interfere with our pre-existing Newsletter signup popup].
So what were the results of our changes? The graph below reveals all. With a simple change in the frequency and timing of posts our weekly reach exploded. This is most likely due to reaching more individuals as opposed to reaching the same people multiple times.
Click To Enlarge
Results of Our 2nd Change
The screenshot below is of our website’s referrals for the 2 week period before and during our Facebook efforts. As you can see, vast improvements. We basically received 1000 extra page views each week (remember, at the time we only had 400 people liking our page). I’ve highlighted the Twitter referrals as well (t.co) as although we designed this campaign for Facebook – using the NextScript Autoposter plugin we also published the same content to Twitter (although we changed the structure of the titles and links etc from within the plugin’s settings). You’ll notice the amount of referrals we got from Facebook Mobile (m.facebook.com). Good thing we had WPtouch installed so our page would look good on any device.
Click To Enlarge
Did Our Plugins Do Their Job?
I was initially skeptical when installing the Facebook Page Promoter Lightbox – no one likes popups. After 2 weeks though, we picked up 50 likes from external “Like” buttons. These buttons were only in 2 places, the first was in the sidebar on the blog page the second was the aforementioned lightbox. I’m almost 100% sure the lightbox is where we picked up all of those likes.
Click To Enlarge
Sling pic and both social sharing bars (vertical and horizontal) picked up a few extra “Likes” and retweets which was nice – nothing to write home about but every little bit counts. WPtouch can be attributed to the 13 mobile likes as although it means people liked our Page from Facebook (on a mobile device), the website must have been attractive enough to have convinced them.
Conclusion
The initial results are all very promising, only time will tell how good a long term strategy this is. The short term gains were an instant increase in likes going from 400 to 550 in 2 weeks, engagement going up and a large increase in unique visitors and page views. There were of course more minor, intricate strategic choices made during this period and still being made now – these will be discussed in a later post.
If you’d like any help setting these plugins up or want to discuss how this can apply to your online strategy get in touch by leaving a comment below.
Wildfire was one of the first apps we found to do promotions on the Facebook platform. Founded by cool Kiwi entrepreneur Victoria Ransom, they got bought by Google and have clearly been spending time refocusing their work onto large customers who can afford $2,500 per month fees. The little people will have to go elsewhere in future.
Here’s a list we curated on List.ly of Wildfire Alternatives. Please add your own favourites.
[listly id=”4KA” layout=”full”]
[read our interview with List.ly c0-founder, Shyam Subramanyan]
No related posts.
https://creativeagencysecrets.com/wp-content/uploads/2014/04/CAS_Logo_1line_RGB.jpg00Rebecca Caroehttps://creativeagencysecrets.com/wp-content/uploads/2014/04/CAS_Logo_1line_RGB.jpgRebecca Caroe2013-04-17 15:56:402020-01-24 01:44:27Alternatives to Wildfire as they withdraw pay-as-you-go
Trade show stands are a strong component of most technology B2B marketing programmes and they are a great place to sweep up new leads for your service.
Our client, FeedBlitz, briefed Creative Agency Secrets to deliver collateral, case studies and a slide deck for their stand at the New Media Expo NMX in Las Vegas, formerly called BlogWorld.
https://creativeagencysecrets.com/wp-content/uploads/2014/04/CAS_Logo_1line_RGB.jpg00Rebecca Caroehttps://creativeagencysecrets.com/wp-content/uploads/2014/04/CAS_Logo_1line_RGB.jpgRebecca Caroe2013-01-08 10:00:002020-01-24 01:44:25Trade show B2B marketing tactics - selling tech to the masses

 With more people opting for anonymous website browsing it is becoming increasingly harder to see how users find your site – in particular, which keywords they searched with.