How To Make Your Anniversary Promotion Campaigns Better

posters for anniversary campaigns
Celebrating an anniversary whether it be one, ten or a hundred years is certainly something to be proud of. You, as a company should almost be bursting at the seams to tell potential and existing customers the news.
Of course, for customers to get as excited as you, they expect something in return. That’s how the system works. They support you for x amount of years and at each anniversary expect a little appreciation. As Mark Twain astutely noted: “It is better to give than receive- especially advice” and following this I will offer my own – He’s right. And this is why businesses offer sales; they give a little in order to gain a lot.
The question of course is how to celebrate and promote your anniversary. This can depend on a variety of facets such as the length of time of existence, the size of the company and the type of company.
It is for this reason I have come up with 4 simple categories.
4 types of anniversary campaigns
- Sales & Giveaways
-
Promotions & Interaction
-
Reincarnation (Sticking with the religious theme)
-
Internal Appreciation
1. Sales & Giveaways – Clever discounts and freebies
This one is relatively straightforward. Simply reducing the final bill for the customer will obviously get them interested – more bang for your buck has traditionally been the ‘go-to’ strategy. Giveaways however can work equally effective. The total bill may not reduce however the value perceived would still have increased. Better yet, it means more of your product is being consumed by your customers.
A common tip often acted upon is to link the number of years celebrated to the sale/gift. Whether it be 10% off if you’re celebrating your tenth anniversary or every 5th item is free for your fifth, linking the years to the deal instils that number into your customers brains, meaning they will be more likely to associate your business with success and longevity. As has been hugely publicised, customers who associate success and longevity with your business are more likely to purchase from you.
Remember, you can be clever about it – 40 years 40% off may be too much of a discount for some stores so be clever! 40 = XL in Roman numerals so have an XL sale, whether it be just a larger sale than usual or a sale focused on extra-large items, it will most likely prove cheaper than 40% off but have a similar effect.
2. Promotions & Interactions – Get the word out there
This deals with how your company reaches out to your customers and the general public. Obviously, if no one has heard that it’s your anniversary no one will be excited. This therefore is critical that it is done right. Larger companies may not have to worry about it and let word of mouth do the work. Smaller companies however have their own competitive advantage – personalization.
Personalized, handwritten notes prove effective time and time again. These interactions will obviously be critical to making your customers aware of your anniversary. Under interaction I have associated cut-cost ways to deliver value to your customer – tours. Customers are always interested in how their favorite good is actually made, so offer it! They aren’t expensive to run as attendees would actually prefer to see the business running as normal as possible and give your business greater exposure to the public..
3. Reincarnation – Bring back the past
I’m sure you’re all familiar with the reincarnation of old products and methods when companies celebrate birthdays or anniversaries so I won’t go into any detail about it. However, many don’t even consider replacing current prices with the traditional ones. An example would be if Coca-Cola were to sell cans for 5c each – their original price. You may be thinking, this should be under the sale category and you’re probably right, but as it refers to the original price, it could be seen as the rebirth of the price; okay compromise, it’s both.
4. Internal Interaction – Celebrate your team
They say nothing is more important than the customer; if that’s true then employees can’t be far behind. When celebrating an anniversary, celebrate your employees’ efforts. They are just as much a part of the company as the customers and therefore, deserve similar recognition and perceived benefits. Traditionally a party always goes down well, however ensure that at least the long-time employees receive a memento, something which they can be proud of and something that will portray your eternal appreciation.
Most successful anniversary campaigns utilize more than one of these categories so for greater success, try and aim to hit at least two. And remember, no matter what strategy you choose, conveying your appreciation for the past and enthusiasm for the future never hurts.
Need help brainstorming and planning ideas? We’d be glad to help. Click here to get in touch with us.
The Top 5 most popular articles of all time
- How To Introduce A Business In Email – How to write a creative brief for an agency
- What Does A Client Brief Look Like? How to ensure clear communication between you and a client
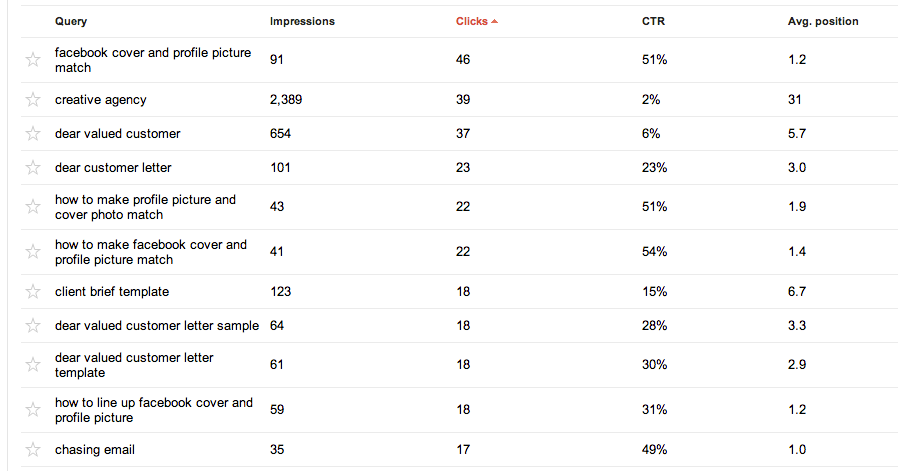
- How To Make Seamless Facebook Profile And Cover Photos – Make your profile picture a part of your cover photo
- Email Autoresponders, A Quick Tutorial – How to take advantage of the vital, but underappreciated auto-respond tool
- Dear Valued Customer, How Not To Write Customer Service Letters – The common mistakes in customer service letters